Showing posts with label eyes. Show all posts

Monday, December 23, 2013

Mommy Makeup Monday: Tips for Touching Up Your Makeup

On Mondays, I share a tip, product or tutorial that will help you look polished and put-together quickly and with minimal effort.  You definitely don't have to be a rushed mom to benefit from these posts...anyone who needs to be out-the-door fast (and who doesn't?!) can appreciate Mommy Makeup Mondays!

No matter how hard I try or how many "long-wear" products I use in the morning, it is inevitable that my makeup will begin to wear off by mid-day.  Most days I honestly just don't care...no one besides my little girl sees me, and she really doesn't mind! 

For those days that I can't exactly run around with mascara or eyeliner smudged under my eyes (still trying to figure out which one is doing it to me!), I have a few tricks on standby to help me touch up and look fresh again in only a few minutes.

                                                                      1.  Keep Q-Tips on you.
These are awesome for getting rid of any product that has smudged to a place you don't want it.  Whether it is mascara on your undereyes, gunk in your inner eye corners (we all get it), lipstick that has bled, or product that has settled into creases or fine lines, q-tips can get the smears away quickly.  A quick brush with a dry q-tip should do it, but if your product is being stubborn, I usually use a tiny (tiny!!) bit of water or a little dab of lotion to help it wipe away. 
My Pick: Q-Tips Precision Tips Cotton Swabs ($3.29 for 170).  These are pointed on the ends, not rounded, so they allow you to get into tight spots much more easily.

2.  Be prepared to combat shine.
Even when I use something like a mattifying spray over my makeup in the morning, I still get shiny by about 2pm.  My skin is oily so it can take a little bit of powder without looking cakey.  I don't typically carry this with me, but if I am home and need to run out, I will just take a nice fluffy brush and a little powder foundation (or a sheer tinted powder) and run it over my T-zone.  For on-the-go or if you have dry skin, keep blotting sheets in your purse.  They'll work wonderfully!
My Picks:  MAC Mineralize Skinfinish Natural ($30) or Cover Girl TruBlend Pressed Powder ($9).  These are so, so similar...I'd go drugstore unless you're looking to spend money at the MAC counter!  For blotting sheets, I love the Boscia Blotting Linens ($10 for 100 sheets) or the Clean & Clear Oil Absorbing Sheets ($4.39 for 50 sheets).

3.  Have those products that wear away quickly with you and ready for you to reapply them.  
On me, this is stuff like concealer, bronzer, blush, and lipgloss.  It's super easy to keep a tiny stick or pot of concealer, a compact with both powders and a little brush in your bag, and you'll be glad you did!  (I will say, though...the only thing I actually keep in my purse in this regard is lipgloss.  I must have 30 of them in my diaper bag!)  Keep in mind, too...these are just your travel products...they don't need to be your favorites.  Inexpensive products are great, too, because if they crack while in your purse, you aren't losing your $30 blush.  
My Picks:  For concealer, I love my Bobbi Brown Face Touch Up Stick ($24).  Pricey, but it works so well, is very compact, and has sturdy packaging.  For re-covering your undereye circles, I love a thinner concealer like the Garnier Skin Renew Anti-Dark Circle Eye Roller ($10.59).  You can easily blend it with your fingers.   For blush and bronzer, I would go with the E.L.F. Blush/Bronzer Duo in St. Lucia ($3).  While I'm normally not a huge E.L.F. fan, for $3 I think this is a great purse item.  It's supposedly a dupe for NARS' Orgasm/Laguna duo, which is $41!!  I would also keep a retractable kabuki brush on hand to apply the powders.  Eco Tools makes a $9 drugstore version; Sephora's comes in at $18 and in 5 colors.  And finally, my must-have purse lipgloss...Victoria's Secret Shiny Kiss Flavored Gloss in Slice of Heaven ($9).  VS renames or repackages this scent/flavor all the time, but through the years I've always been able to find the cake batter flavored gloss.  It smells divine and leaves the prettiest shine on your lips.  It's slightly sticky, but it's worth the tradeoff for its staying power.

What are your go-to tricks for touching up your eye makeup?
As always, everything in this post is my honest personal opinion.  No affiliate links were used.  I have not accepted any consideration for sharing these items with you.  Unless indicated otherwise, all products were purchased by me with my own money.

Friday, December 20, 2013

Product Review: Jane Cosmetics Water-Resistant Eyeliner

Back in my first Ulta Haul, I shared that I purchased the Jane Cosmetics Water-Resistant Eyeliner ($6) after hearing that it was great for the waterline.  Today, after being able to really test it out, I wanted to share my full thoughts on it.
Image Source: Janecosmetics.com

Simply said, this liner is awesome!  Now, I really, seriously did not need another black eyeliner since I have a billion of them to begin with.  But I never really found that Holy Grail black liner for my waterline that would actually stay put all day without smudging and smearing below my eyes.  So long story short, I kept buying more and more and more in the hope that at least one would stay put.

I think the Jane one might just be my HG black pencil liner.  It transfers really easily and is very black.  Not only does it actually stay on my waterline all day, but it doesn't creep down into my undereye area, either.  It also doesn't smudge on my top lid, even though my lids are oily.

I also love that it's a mechanical pencil, so there's no need to bring a sharpener if you want to travel with this.  And the best part...it's $6!  Ulta constantly has coupons and other promotions, so you should be able to pick this up for even less than that.

To compare it to other popular liners, it transfers just as easily as the Urban Decay 24/7 pencils, but lasts much longer on me.  It isn't quite as black as something like the Perversion pencil from UD, but definitely holds a candle to shades like UD's Zero, Mac Feline or Smolder, or Stila's Onyx.

I would absolutely recommend this liner, and I'm tempted to pick up a few more in some other colors (Ulta offers 20 shades).  In particular, I'm really digging the Rose Gold shade, and I'd love to try Black Sparkle, Deep Purple, and Midnight Blue.

Have any of you tried this liner?  Do you love it?  What shades must I grab?!

As always, everything in this post is my honest personal opinion.  No affiliate links were used.  I have not accepted any consideration for sharing these items with you.  Unless indicated otherwise, all products were purchased by me with my own money.

Wednesday, December 4, 2013

The Perfect Palette Tag

I LOVE a good eyeshadow palette.  Who doesn't?  They're usually a great value and can help make deciding what to do with your makeup a breeze.  Plus obviously they're awesome to travel with. 

Rather than just share with you my favorite palettes, I thought I would do a tag that's been going around YouTube lately...the Perfect Palette Tag!  Amarixe recently did this video...that's where I first saw it.  If you haven't checked out her channel, definitely do!

Without further ado...

1.  Best Packaging.  Gotta go with one of the Naked Palettes for this.  They're compact, have nice big mirrors, and they each have a spot for either a brush or an eyeliner. 

Wet N Wild Comfort Zone
2.  Best Color Payoff.  I'm going to choose the Wet N Wild 8 Pan Palette in Comfort Zone for this!  For $5, how could you go wrong.  This is surprisingly pigmented.  (I mean at this point it's no great shock that Wet N Wild makes awesome shadows, but when these all came out, I think everyone was skeptical of their quality.)  Comfort Zone has great neutral browns and greens and every shade has great payoff.

3.  Most Versatile.  Naked 1.  It's easily my favorite palette.  You can do everything from just a wash of a simple neutral shimmer (Virgin or Sin), to something a tad bit more amped up with a nice crease color, to something really dramatic using the darker shades.  You can even stamp on some eyeliner if you use the darker colors.  You can't beat this one!

Too Faced Natural Eye
4.  Best for Travel.  Too Faced Natural Eye Palette.  Another awesomely neutral palette.  I love a few of the shades in here, especially Push Up.  I wouldn't hesitate to travel with this because you have everything from matte neutrals and soft shimmery browns to a glittery peach and a nice dark color, too.  Plus, it's small and compact (which is why it beat out Naked 1!)

Mac Evil Eye...notice my attempt to save it!


5.  Biggest Regret.  Easy peasy for me.  I wasted my money on the Mac Evil Eye quad back when it came out.  I don't think I've ever used it because the colors are just terrible.  No payoff whatsoever.  I even tried crushing them up and reforming them, but it made no difference.  It's such a crap palette.  That purchase taught me to do my research before buying anything!!

6.  Best Color Names.  This was a toughie, but I have to choose the Too Faced Naked Eye Palette.  I tend not to use this all that often, as the shades are all very soft and natural (I like some drama, what can I say!) but the names are super cute!  The shades include Stiletto, Unmentionables, and Birthday Suit.  (If I owned their Boudoir Eyes Palette, I think I'd have to pick that!)

Image Source: Sephora.com
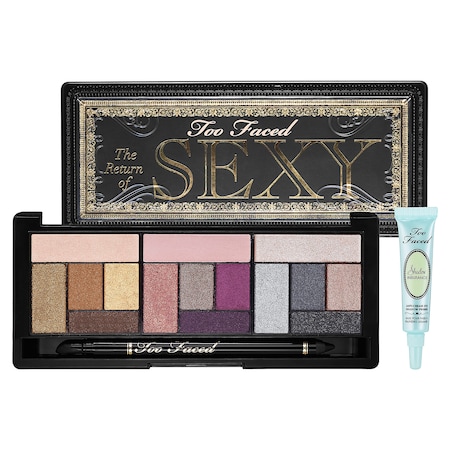
7.  Least Used.  Too Faced Return of Sexy Palette.  I had such high hopes for this because when I swatched it in store, it seemed fabulous.  The colors seemed rich and velvety and I thought they would blend like a dream.  I did my homework and read up on it, and found that most reviews said it was fine if you were willing to work with it.  I would agree with that...it's a great palette if you have plenty of time to really work with the colors.  Most are really shimmery and create a lot of fallout.  You MUST use a good primer (even a glitter glue, dare I say for some!) and most need to be sprayed with Fix+ or another spray to get decent payoff.  It's a fun palette, but it takes me 3 times as long to use it, so I don't choose it often.

8.  Most Used, Most Loved, Desert Island.  Definitely Naked 1.  The colors are wonderfully neutral and it includes one of my favorite blending colors...Naked.  The looks you can do with Naked 1 are endless.

Hope you enjoyed!  Please share with me your favorite palettes!


As always, everything in this post is my honest personal opinion.  No affiliate links were used.  I have not accepted any consideration for sharing these items with you.  Unless indicated otherwise, all products were purchased by me with my own money.

Wednesday, November 20, 2013

Get Ready With Me! An Average Morning...

Today I'm sharing what I do on an average morning for makeup.  This 10-minute look is pretty typical for me.  Hope you enjoy!


Products Used:  (ps, sorry it's so Mac heavy!  didn't mean that...)
Clarins Bright+ Brightening Hydrating Lotion ($62) (given to me as a gift by my sister)
Urban Decay Primer Potion in Eden ($20)
Mac Paint Pot in Nubile (limited edition)
Mac Eyeshadows in All That Glitters and Moleskin (limited edition) ($15)
Sigma E55 Eye Shading Brush  ($12)
Mac 224 Tapered Blending Brush ($32)
Makeup Geek Eyeshadow in Taupe Notch ($6)
Mac 217 Blending Brush ($24)
Mac Fluidline in Blacktrack ($16)
Sigma E05 Eye Liner Brush ($12)
Mac Haute & Naughty Too Black Lash Mascara ($21)
Beauty Blender ($20)
Loreal True Match Lumi Foundation ($13)
Mac Mineralize Concealer ($20)
Anastasia Brow Wiz ($21)
Soleil Tan de Chanel Bronzing Makeup Base ($48)
NARS Blush in Sin ($29)
Sigma F40 Large Angled Contour Brush ($19)
The Balm Mary-Lou Manizer ($24)
Sigma F05 Small Contour Brush ($18)
Soap & Glory A Great Kisser Lip Balm in Peppermint ($10)

As always, everything in this post is my honest personal opinion.  No affiliate links were used.  I have not accepted any consideration for sharing these items with you.  Unless indicated otherwise, all products were purchased by me with my own money.

Tuesday, November 19, 2013

Face of the Day: Red Lips!


I decided to rock some nice red lips today!  I'm getting SO excited for the holidays with my little one here this year, I couldn't resist being a little festive with my makeup today!

Products Used:

Urban Decay Primer Potion in Eden layered with Mac Paint Pot in Soft Ochre.  (Not pictured.  Individually, each of these crease on me, but layered they don't.)

Mac Eyeshadow in All that Glitters. (Placed on the lid)

Makeup Geek Eyeshadows in Creme Brulee and Frappe.  (Blended into the crease.  These shadows are AWESOME.)

Mac Fluidline in Blacktrack.  (As of right now, this is my HG eyeliner.)

Mac Haute & Naughty Too Black Lash.  (I have been liking this a lot more than I originally thought I would!  I layer using the volume wand first and then the length wand.)

Loreal True Match Magic Lumi Foundation.  (Very similar to one of my favorites, Neutrogena Healthy Skin, but this is a better winter shade for me.)

Mac Mineralize Concealer.  (My shade is NW20.  I love this because it doesn't settle in my fine lines.)

Hourglass Ambient Lighting Powder in Diffused Light.  (This is barely yellow and helps hide any redness and blurs pores.  It's SO good!)

Anastasia Brow Wiz.  (I use Caramel to lightly define my brows and fill in bare spots.)
 
Too Faced Chocolate Soleil Matte Bronzer in Milk Chocolate/Light/Medium (Great for my skin tone in winter...not too dark and not too orange.  Plus it smells SO good!)

Mac Blush in Melba  (Perfect go-to peachy pink color that will be flattering on most skin tones.)

Dior Amber Diamond (Used as a cheek highlighter.  Beyond amazing!!!  Worth every penny!)

Bite Beauty Lipstick in VIB Rouge Red :)  (This came in the little package Sephora gave me when I made VIB Rouge!  It's just a very flattering bright red.)

Hope you enjoyed :)


As always, everything in this post is my honest personal opinion.  No affiliate links were used.  I have not accepted any consideration for sharing these items with you.  Unless indicated otherwise, all products were purchased by me with my own money.

Monday, November 18, 2013

Mommy Makeup Monday: 2-Minute Eyes

On Mondays, I share a tip, product or tutorial that will help you look polished and put-together quickly and with minimal effort.  You definitely don't have to be a rushed mom to benefit from these posts...anyone who needs to be out-the-door fast (and who doesn't?!) can appreciate Mommy Makeup Mondays!
 
Another new week!  With the holidays coming up, we're all even busier than normal, so having a super quick go-to eye look that you can fall back on morning after morning is key to getting out the door quickly.  Keep reading for my two-minute easy eyes!  (And yes, it really only takes 2 minutes.  I timed it!)


You'll Need:
2 or 3 eyeshadows - a light shimmer and a medium brown matte crease color, plus an optional dark matte shade (black or brown are best; you can also grab your favorite eyeliner instead of that third dark shadow)
Mascara
2 eye brushes - a flat shader brush and a big fluffy crease brush (like a Mac 224)

What You'll Do:
1.  Apply your light shimmery shadow to your lid and inner corner area.  Use your flat shader brush to pack the color on.
My Picks:  Mac Vanilla, Mac Naked Lunch, Stila Kitten, Urban Decay Virgin or Sin (both in Naked 1), Urban Decay Bootycall (Naked 2), Loreal Infallible in Iced Coffee, Maybelline Color Tattoo in Barely Branded.


2.  Apply the medium brown matte color in your crease.  The bigger and fluffier the brush, the better.  You can absolutely use a more-dense brush (like a 217), but it will take more blending (read, more time) to crease a flawless look.  The best color will be 2 or 3 shades darker than your skintone, because it will give your eye definition and also help blend our any harsh edges from your lid color. 
My Picks: Mac Moleskin (limited edition), Mac Soft Brown, Makeup Geek Creme Brule, NYX Nude, Urban Decay Naked or Buck (both in Naked 1). 


3.  Take the darkest shadow and get it just on the tip of your shader brush.  Push it into your lashline to make it look like eyeliner.  It's perfectly OK if it looks smudgey and imperfect!  (Alternatively, you can line your eyes with a pencil, gel or liquid liner, but using shadow and not being too fussy is so much faster.)
My Picks: Mac Carbon, Urban Decay Hustle (Naked 1), Urban Decay Blackout (Naked 2), NYX Black, Makeup Geek Corrupt, Mac Smut.  You could even go with a fun dark color, like purple or green.


4.  Add mascara to your top lashes (and bottom if you have time) and you're done!


I used my Naked 1 Palette for this look, specifically the colors Sin, Naked, and Hustle.  My mascara is Mac's Haute & Naughty Too Black Lash.


So lovelies, what is your go-to quick look?  Share!


As always, everything in this post is my honest personal opinion.  No affiliate links were used.  I have not accepted any consideration for sharing these items with you.  Unless indicated otherwise, all products were purchased by me with my own money.

Tuesday, November 12, 2013

Pinspiration: Purple Lids

I'm a huge fan of Pinterest...I absolutely love getting great beauty tips and ideas while browsing the Beauty tab.  I also really love to recreate looks I've found, and from time to time, I'll be sharing my Pinterest-inspired eyes with you :)

Today's purple eye is one that I've admired for a while.  I'm always trying to find a way to make color more wearable, and I think this nails it.

Original pin is here.  Follow me on Pinterest here.

Image From Pinterest


My Recreation

 I've recreated this look a few times, but I've always worn browns in my crease to make it a little more everyday-appropriate.  However, I never felt like I really had the look quite the same as the original pin.  The secret was using a purple to define my crease.

Here's how I recreated this eye, step by step:

1.  Prime lid with a base to prevent creasing and help shadows stay vibrant longer.  I used Urban Decay's Primer Potion in the color Eden.  I then layered that with the Maybelline Color Tattoo in Too Cool, which is a shimmery white.  (The original pin is shimmery, but my shadows were all matte, so I used a shimmery base.  The Color Tattoo is unnecessary if you're using shimmery shadows.)

2.  On a fluffy crease brush, blend a brown shadow just a bit darker than your skintone into your crease, and blend it up to your browbone.  I used Mac's Moleskin, which was limited edition.  Other options: Mac Soft Brown, Urban Decay Naked, Makeup Geek Creme Brule.  My brush was a Mac 224.

3.  On a more precise crease brush, blend a dark, warm purple into your outer crease.  (I used a Mac 222, which is no longer sold.  Sigma's E35 brush is a good alternative.)  I used an old shadow that is no longer for sale anywhere I could find, but there are a lot of options that will work.  Mac Sketch or Shadowy Lady, Urban Decay Rockstar (check your palettes...this was in many of them!), or the Wet N Wild Petal Pusher palette are great options.  Start with a little and build the color up until your eye is defined to your liking.

4.  Pat a warm, light purple onto your lid, staying below the crease, with a stiff shader brush.  I used Sigma's E55 brush, and a combination of 2 colors on my lid...Inglot 379 (bluer toned) and Inglot 334 (purpler toned).

5.  Highlight your inner corner and browbone with a light, slightly shimmery shade.  I used Mac's Mylar.

6.  On your lower lashline, smudge the lighter purple shadow on the inner half, and the darker purple that you used in your crease on the outer half.  I used a pencil brush for this...Sigma's E30 brush.

7.  Line your top lashline with black liquid liner.  I did not see a discernible wing in the inspiration photo, so I did not wing my liner.  You absolutely could do a wing though!  I used Loreal's Lineur Intense Carbon Black liner.

8.  You really want to make sure that your upper lashline is very dark with no light spots at all.  To do this, I smudged the liquid liner into my lashline from underneath my lashes, as well.  I also lined my upper waterline with a black pencil liner.  I used Urban Decay's 24/7 Liner in Perversion.

9.  Line your lower waterline and all the way into your inner corner with a black pencil.  Again, I used Urban Decay's 24/7 Liner in Perversion.

10.  Add lots of black mascara!  I used Mac's Haute & Naughty Too Black Lash, and I used only the volumizing wand.  You could definitely add some false lashes, too, especially ones that emphasize the outer corner of your eye.

Let me know what you think of my recreation!  Will you try this look?  What colors will you use?  Do you have a look you found on Pinterest you'd like me to recreate?  Send me the pin, or email me at abeautylush@gmail.com :)

Thanks for stopping by!  I hope you enjoyed!

As always, everything in this post is my honest personal opinion.  No affiliate links were used.  I have not accepted any consideration for sharing these items with you.  Unless indicated otherwise, all products were purchased by me with my own money.
Thursday, November 7, 2013

My Top 10 Mac Eyeshadows

Hello Loves!  Today I'm sharing my Top 10 Mac Eyeshadows with you all.  I have to admit, I have a LOT more Mac shadows than I really need, but I've been collecting for over 10 years and I did get quite a few free as Back to Mac items. They're listed in no particular order...the just match the swatches :)

For reference, in Mac foundations I am generally in the range of NC30. 


Grand Entrance (Starflash)
This was a Limited Edition shade launched in 2009's Love that Look Collection.  It is a light, shimmery beige that has such an incredible sheen to it.  I wore this on my wedding day, and it still one of my top favorite shadows...this may even be my very favorite Mac shadow.  You can find it online (All Cosmetics Wholesale has it for $24 at the time of this post), but you can also get a pretty close dupe - Stila's Kitten eyeshadow.  The two are super similar...close enough that I won't be upset when I eventually use up Grand Entrance.

Mylar (Satin)
This is the perfect highlight color for my skintone.  It is a cream color, and has just the smallest amount of sheen to it, but not enough to make my browbone look shiny.

Vanilla (Velvet)
I use Vanilla for both highlighting and as a lid color.  It's the perfect creamy shade, and the shimmer that you see in the pan does not translate to the skin.  This is just a touch lighter than my natural lid color, so I like to use it to lighten and brighten up my eyes.  It is for me what Brule would be for someone in the NC35/NW25 range.


Naked Lunch (Frost)
I love to use this shade on my lids with a cool brown in the crease.  It's light pink, but translates as more beige-toned on the skin.  It looks so pretty, and it just shimmery enough to create a nice bright look without being over the top.

Stars N' Rockets (Veluxe Pearl)
This is a very pink-toned purple duochrome, and it's my favorite purple shadow by far!  It's actually a lot more useable and wearable than you may think, and when layered with different shadows or cream products, this takes on various different looks.  I love layering it over a navy blue eye pencil on my lid to create a darker, smoldering smoky eye, or over a white base on my lid with browns in my crease to have some fun with my eyes, or smudged under my lower lashline for a wearable pop of color.

Moleskin (Matte)
This was a Limited Edition shade launched in 2011's Mac Me Over Collection.  This is definitely in the running for my #1 Mac shadow.  I probably use this most frequently, as it is the best color for me to blend out my crease colors with.  It's very similar to Urban Decay's Naked, which is sold individually and also comes in the original Naked Palette.

Tempting (Lustre)
I think Tempting might be the most underrated Mac shadow!  I never hear anyone talking about it, but I am obsessed!  It's so sparkly, flattering and versatile.  It's a bronzey brown color and I use it both on my lid or in my crease for different looks.  Definitely one of my most-used!

Satin Taupe (Frost)
Who doesn't love this shade?  I'm not even sure anything I can say about it will add to what has already been said!  It's just the perfect shimmery grey-brown.  The end.  (If you love the shade but not the $15 price tag, Wet N Wild has come very close to duping this!  One of the shades in the Silent Treatment trio and their individual shadow in the shade Nutty are both super close.)

Sketch (Velvet)
I absolutely love this purpely brown.  I typically use Sketch in my crease with something light and shimmery on my lid (I wore this with Grand Entrance for my wedding).  It can come off more grey when paired with certain colors, but used with a light shimmer and blended out with a matte brown (like Moleskin) you really can't go wrong with it!

Handwritten (Matte)
I love to use this dark warm brown to add dimension in my crease or outer V area.  It flatters my skintone very nicely and blends like a dream.

So readers...what are you favorite Mac shadows?  What other dupes are there that I need to know about?!

As always, everything in this post is my honest personal opinion.  No affiliate links were used.  I have not accepted any consideration for sharing these items with you.  Unless indicated otherwise, all products were purchased by me with my own money.

Tuesday, October 29, 2013

I Have A Black Eyeliner Problem

For some odd reason, I decided to count how many black eyeliners I have in my collection.  18.  I have freakin EIGHTEEN black eyeliners.  A little much, no?  12 pencils, 5 liquids, and 1 gel.  Who needs this much black eyeliner?!  If my husband reads this, you'll see me on the next episode of Hoarders.

In an attempt to justify my ridiculousness, I figured I may as well swatch them and hope they're at least a little different.  


Here are my 12 black pencils.


And my 5 liquids and 1 gel.


My ultimate conclusion - I definitely don't need this many black liners.  However, even though many of them do swatch identical similarly, the textures and wear times do vary greatly.  Here are my top picks and the biggest misses from my collection.

Best Black Eyeliners

1.  Mac's Fluidline in Blacktrack ($16).  This gel liner is pretty much Holy Grail for me.  Definitely my go-to daily liner, even though it does smudge a little, and it irritates my contact lenses when I use it on my waterline.  I love the deep color and the crisp line I can get with it.

2.  Loreal Lineur Intense Carbon Black ($8.99).  The felt tip makes this liquid liner basically foolproof.  Great black color and doesn't smudge at all, even on my oily lids.  Comparable to Makeup Forever's Aqua Liner ($23) in my mind, but I like the price point or Loreal's liner much better!

Worst Black Eyeliners

1.  Mac's Penultimate Liner ($19.50).  I should just toss this, I never use it.  It's barely black, has a dry formula, and doesn't transfer easily to the lid.  Maybe mine is a dud??

2.  Too Faced Perfect Eyes Waterproof Eyeliner ($18).  I love how black this is, but omg it gets everywhere.  Waterproof my ass!  It's super smudgey, which can be a great thing, but not when it claims to be waterproof and it smears all over your face when you don't want it to.  Maybe it's my oily lids, but I wouldn't purchase this liner.  (Mine came with a palette...I didn't purchase it separately.)

What black eyeliners do you love or hate?  Are there any I am missing that can justify adding to my collection?  Help me feed my addiction :)


As always, everything in this post is my honest personal opinion.  No affiliate links were used.  I have not accepted any consideration for sharing these items with you.  Unless indicated otherwise, all products were purchased by me with my own money.

Monday, October 28, 2013

Mommy Makeup Monday: Whiter, Brighter Eyes in 1 Super Easy Step

On Mondays, I share a tip, product or tutorial that will help you look polished and put-together quickly and with minimal effort.  You definitely don't have to be a rushed mom to benefit from these posts...anyone who needs to be out-the-door fast (and who doesn't?!) can appreciate Mommy Makeup Mondays!

Happy Monday!  Today I have a great tip for all those sleep-deprived moms people out there.  This 20-second trick can help you look well-rested and will make your eyes look big and bright.

Lining your lower waterline with a white or a "nude for me" (i.e. your skin stone) eyeliner helps create the illusion of more open, whiter and brighter eyes.  It reduces redness and the natural pink tone of the waterline, and will make you look like you got 10 hours of sleep.  (We can dream, can't we?!)


In the photos above, you can see how much more bright-eyed I look with white or beige in my waterline.  The top left shows Stila's Kajal Eye Liner in Topaz. (The shade is now called Apricot Nude...it is $18 at Sephora.)  On the top right, I used Rimmel's Soft Kohl Kajal Pencil in Pure White. (It's only $3.99 at Ulta...can you beat that?!)  The bottom photo shows my eye with no liner.

Conversely, lining in black will close up your eyes.  (It is a great trick for those with big eyes who want to make them look smaller.)  Black also gives a more dramatic look to the eye, but doesn't help you look more well-rested and awake.  Below, on the left is my eye with no liner.  On the right, my waterline has Mac's Kohl Power Eye Pencil in Feline ($16) on it.

 
(In all 5 photos above, I am wearing Mac's Paint Pot in Nubile on my lids (it was limited edition, but is similar to Painterly), Mac's Haute & Naughty Too Black Lash Mascara (the length wand) on top and bottom lashes, Maybelline Fit Me Concealer under my eyes, and Anastasia Brow Wiz in Caramel to define my brows).

A quick note - I personally prefer a flat, matte white for the lower waterline, as opposed to a shimmery white.  Shimmer looks nice, but I find that matte white is more flattering.  I use my shimmery white pencils for inner corner and brow highlights.

Other great options for these shades in eyeliner pencils:

High End Beige Pencils:
Tarte EmphasEYES Inner Rim Brightener - $19 at Sephora
NARS Larger Than Life Long Wear Eyeliner in Rue Bonaparte - $24 at Sephora
Illamasqua Medium Pencil in Hex or Vow- $20 at Sephora

High End White Pencils:
Mac Eye Kohl in Fascinating - $16
NARS Larger Than Life Long Wear Eyeliner in Santa Monica Blvd - $24 at Sephora

Drugstore Beige Pencils:
Rimmel Scandal Eyes Waterproof Kohl Liner in Nude - $4.49 at Ulta
(This is the only one I could find!!  If you know of another, please leave it in the comments below!)

Drugstore White Pencils:
NYX Slide On Pencil in Pure White - $7.99 at Ulta
Jane Cosmetics Water-Resistant Eyeliner in Pure White - $6 at Ulta (on sale right now for $4!)
Prestige Kohl Eyeliner in White - $4.29 at Ulta

Tell me what you think!  Will you try this quick tip?  Do you already do this on a daily basis to help fake sleep?  What are your favorite pencils?

As always, everything in this post is my honest personal opinion.  No affiliate links were used.  I have not accepted any consideration for sharing these items with you.  Unless indicated otherwise, all products were purchased by me with my own money.