Showing posts with label quick & easy. Show all posts

Monday, December 23, 2013

Mommy Makeup Monday: Tips for Touching Up Your Makeup

On Mondays, I share a tip, product or tutorial that will help you look polished and put-together quickly and with minimal effort.  You definitely don't have to be a rushed mom to benefit from these posts...anyone who needs to be out-the-door fast (and who doesn't?!) can appreciate Mommy Makeup Mondays!

No matter how hard I try or how many "long-wear" products I use in the morning, it is inevitable that my makeup will begin to wear off by mid-day.  Most days I honestly just don't care...no one besides my little girl sees me, and she really doesn't mind! 

For those days that I can't exactly run around with mascara or eyeliner smudged under my eyes (still trying to figure out which one is doing it to me!), I have a few tricks on standby to help me touch up and look fresh again in only a few minutes.

                                                                      1.  Keep Q-Tips on you.
These are awesome for getting rid of any product that has smudged to a place you don't want it.  Whether it is mascara on your undereyes, gunk in your inner eye corners (we all get it), lipstick that has bled, or product that has settled into creases or fine lines, q-tips can get the smears away quickly.  A quick brush with a dry q-tip should do it, but if your product is being stubborn, I usually use a tiny (tiny!!) bit of water or a little dab of lotion to help it wipe away. 
My Pick: Q-Tips Precision Tips Cotton Swabs ($3.29 for 170).  These are pointed on the ends, not rounded, so they allow you to get into tight spots much more easily.

2.  Be prepared to combat shine.
Even when I use something like a mattifying spray over my makeup in the morning, I still get shiny by about 2pm.  My skin is oily so it can take a little bit of powder without looking cakey.  I don't typically carry this with me, but if I am home and need to run out, I will just take a nice fluffy brush and a little powder foundation (or a sheer tinted powder) and run it over my T-zone.  For on-the-go or if you have dry skin, keep blotting sheets in your purse.  They'll work wonderfully!
My Picks:  MAC Mineralize Skinfinish Natural ($30) or Cover Girl TruBlend Pressed Powder ($9).  These are so, so similar...I'd go drugstore unless you're looking to spend money at the MAC counter!  For blotting sheets, I love the Boscia Blotting Linens ($10 for 100 sheets) or the Clean & Clear Oil Absorbing Sheets ($4.39 for 50 sheets).

3.  Have those products that wear away quickly with you and ready for you to reapply them.  
On me, this is stuff like concealer, bronzer, blush, and lipgloss.  It's super easy to keep a tiny stick or pot of concealer, a compact with both powders and a little brush in your bag, and you'll be glad you did!  (I will say, though...the only thing I actually keep in my purse in this regard is lipgloss.  I must have 30 of them in my diaper bag!)  Keep in mind, too...these are just your travel products...they don't need to be your favorites.  Inexpensive products are great, too, because if they crack while in your purse, you aren't losing your $30 blush.  
My Picks:  For concealer, I love my Bobbi Brown Face Touch Up Stick ($24).  Pricey, but it works so well, is very compact, and has sturdy packaging.  For re-covering your undereye circles, I love a thinner concealer like the Garnier Skin Renew Anti-Dark Circle Eye Roller ($10.59).  You can easily blend it with your fingers.   For blush and bronzer, I would go with the E.L.F. Blush/Bronzer Duo in St. Lucia ($3).  While I'm normally not a huge E.L.F. fan, for $3 I think this is a great purse item.  It's supposedly a dupe for NARS' Orgasm/Laguna duo, which is $41!!  I would also keep a retractable kabuki brush on hand to apply the powders.  Eco Tools makes a $9 drugstore version; Sephora's comes in at $18 and in 5 colors.  And finally, my must-have purse lipgloss...Victoria's Secret Shiny Kiss Flavored Gloss in Slice of Heaven ($9).  VS renames or repackages this scent/flavor all the time, but through the years I've always been able to find the cake batter flavored gloss.  It smells divine and leaves the prettiest shine on your lips.  It's slightly sticky, but it's worth the tradeoff for its staying power.

What are your go-to tricks for touching up your eye makeup?
As always, everything in this post is my honest personal opinion.  No affiliate links were used.  I have not accepted any consideration for sharing these items with you.  Unless indicated otherwise, all products were purchased by me with my own money.

Monday, December 16, 2013

Mommy Makeup Monday: The e.l.f. Makeup Remover Pen

On Mondays, I share a tip, product or tutorial that will help you look polished and put-together quickly and with minimal effort.  You definitely don't have to be a rushed mom to benefit from these posts...anyone who needs to be out-the-door fast (and who doesn't?!) can appreciate Mommy Makeup Mondays!

Happy Monday!

Today I want to share a tool that I use all. the. time for quick touch ups and to get those pesky mascara smudges off my face.  I featured this product in my November Favorites, but decided it needed its own post!

The e.l.f. Studio Makeup Remover Pen ($3) is one of the best little items I own!  I grabbed mine at Target after hearing about it on Josh Collier's YouTube channel.  Until I found this gem, I have to be honest, I had never used an e.l.f product that I actually liked, so I was a bit skeptical.  The makeup remover pen, however, is an awesome find!

Image Source: Drugstore.com
The pen is the perfect size for getting into the corners of your eye or below your lower lashes.  It is filled with an oil-based makeup remover that works wonderfully for taking off excess or smudged makeup.  It does leave a slight residue behind, but I have found that it quickly absorbs into my skin once it dries, or I can just rub it in if I'm in a rush.  

The applicator is a cross between a sponge tip and a felt tip, but it is hard enough that you get complete control over it.  Another plus...when the tip starts to get dirty and filled with makeup, pull it out and flip it over for a perfectly clean side! 

I've used this pen at least a few times a week either to fix blotched mascara application or to touch up in the afternoon when my makeup is all smudged...and it's lasted me a good 6 months, and is still going strong. 

Overall, this is an all-time favorite product of mine!  I will definitely continue to purchase it, and I love that it's a great steal at only $3!

Have you tried this pen?  Do you love it as much as I do?

As always, everything in this post is my honest personal opinion.  No affiliate links were used.  I have not accepted any consideration for sharing these items with you.  Unless indicated otherwise, all products were purchased by me with my own money.

Monday, December 2, 2013

Mommy Makeup Monday: If You Only Do 1 Thing...Make It Mascara!

On Mondays, I share a tip, product or tutorial that will help you look polished and put-together quickly and with minimal effort.  You definitely don't have to be a rushed mom to benefit from these posts...anyone who needs to be out-the-door fast (and who doesn't?!) can appreciate Mommy Makeup Mondays!

Happy December!  Welcome to the busiest month of the year...which leaves us all even less time for makeup in the mornings.  Funny, since we all have even more errands to run and places to be!  

For today's quick and easy makeup tip, I'm sharing my #1 must-do thing before you leave the house.  Even if you have no time to fool with foundations and blushes, there is just one step you can make time for...it only takes a minute.

MASCARA!  

 
Giving your lashes a super fast curl (if you even need it...) and a swipe of black mascara instantly makes your eyes more open and makes you look more awake.  Keep a tube out on your bathroom counter and run it over your top lashes before you turn the light off to leave the house.  One coat takes less than a minute and will make a HUGE difference.  (If you have 2 minutes, add some to your bottom lashes and maybe a tiny bit of concealer if you have dark circles...no need for anything else!)

Here are my top picks for mascaras!
a more detailed mascara post is coming soon!

#1 - My Holy Grail Mascara - Benefit They're Real.
Yes, I know it's pricey, but Oh Em Gee.  This really does make my lashes look like falsies.  It's a wet formula, but does an amazing job with both volume and length.  I've found nothing that even comes close.


If you like wet formulas.... Loreal Telescopic Carbon Black or Buxom Lash

If you like dry formulas.... Revlon Grow Luscious or Makeup Forever Smoky Lash  (DiorShow is the cult favorite here, but personally I am not a fan.  At all.  It's beyond overpriced, and Grow Luscious is basically the same thing for 1/4 of the price.)

If you want easy to remove.... Loreal Double Extend Beauty Tubes or MAC Extended Play Lash (both of these are tubing mascaras)

Share with me your favorite mascaras!  I'm always looking for new ones to try :)


As always, everything in this post is my honest personal opinion.  No affiliate links were used.  I have not accepted any consideration for sharing these items with you.  Unless indicated otherwise, all products were purchased by me with my own money.

Monday, November 25, 2013

Mommy Makeup Monday: My New Favorite Topcoat

On Mondays, I share a tip, product or tutorial that will help you look polished and put-together quickly and with minimal effort.  You definitely don't have to be a rushed mom to benefit from these posts...anyone who needs to be out-the-door fast (and who doesn't?!) can appreciate Mommy Makeup Mondays!

The start of a nice short week!!  I hope you're all enjoying the last three days before the Christmas Season officially begins.

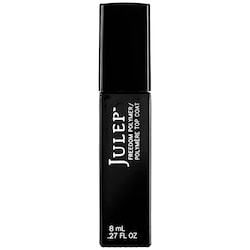
Image Source: Sephora.com
Today I have a nail polish topcoat that I was lucky enough to find recently.  A few weeks ago I snagged a mini of the Julep Freedom Polymer Top Coat ($18) from Sephora as a 100 point perk and I am IN LOVE with this stuff.  It is the perfect solution for a mom who is trying to beat the nap time clock or who has to be out the door to do a ballet class pickup...you know what I'm getting at!

Julep says that this topcoat "sets" in natural light in 5 minutes, and I have to completely agree.  I get professional, salon quality gel like results with this polish and I am 100% smudge free in 5 minutes.  I will say that I don't get the long-lasting results of a professional gel mani, but I say that with the caveat that I am really hard on my nails.  A normal polish change will last me 2 days before I have to repolish.  With this topcoat, I can get 3 days (same as my other newest love, Sephora's Formula X Polishes.)

I know this one is pricey, but if you can grab the 100 point perk I would highly recommend "spending" your points on this!  I have a small stockpile of topcoats to go through (another Seche Vite, an Out the Door, a Formula X, and this mini) so I won't be purchasing right away, but when I work through my stash, I think I'll go for the full size Julep.  I absolutely love the fact that within 5 minutes of putting it on, my nails are completely dry to the point where I can do dishes, change a diaper, or (wishful thinking) go to bed!

Have you tried this topcoat?  What are your thoughts?


As always, everything in this post is my honest personal opinion.  No affiliate links were used.  I have not accepted any consideration for sharing these items with you.  Unless indicated otherwise, all products were purchased by me with my own money.

Monday, November 18, 2013

Mommy Makeup Monday: 2-Minute Eyes

On Mondays, I share a tip, product or tutorial that will help you look polished and put-together quickly and with minimal effort.  You definitely don't have to be a rushed mom to benefit from these posts...anyone who needs to be out-the-door fast (and who doesn't?!) can appreciate Mommy Makeup Mondays!
 
Another new week!  With the holidays coming up, we're all even busier than normal, so having a super quick go-to eye look that you can fall back on morning after morning is key to getting out the door quickly.  Keep reading for my two-minute easy eyes!  (And yes, it really only takes 2 minutes.  I timed it!)


You'll Need:
2 or 3 eyeshadows - a light shimmer and a medium brown matte crease color, plus an optional dark matte shade (black or brown are best; you can also grab your favorite eyeliner instead of that third dark shadow)
Mascara
2 eye brushes - a flat shader brush and a big fluffy crease brush (like a Mac 224)

What You'll Do:
1.  Apply your light shimmery shadow to your lid and inner corner area.  Use your flat shader brush to pack the color on.
My Picks:  Mac Vanilla, Mac Naked Lunch, Stila Kitten, Urban Decay Virgin or Sin (both in Naked 1), Urban Decay Bootycall (Naked 2), Loreal Infallible in Iced Coffee, Maybelline Color Tattoo in Barely Branded.


2.  Apply the medium brown matte color in your crease.  The bigger and fluffier the brush, the better.  You can absolutely use a more-dense brush (like a 217), but it will take more blending (read, more time) to crease a flawless look.  The best color will be 2 or 3 shades darker than your skintone, because it will give your eye definition and also help blend our any harsh edges from your lid color. 
My Picks: Mac Moleskin (limited edition), Mac Soft Brown, Makeup Geek Creme Brule, NYX Nude, Urban Decay Naked or Buck (both in Naked 1). 


3.  Take the darkest shadow and get it just on the tip of your shader brush.  Push it into your lashline to make it look like eyeliner.  It's perfectly OK if it looks smudgey and imperfect!  (Alternatively, you can line your eyes with a pencil, gel or liquid liner, but using shadow and not being too fussy is so much faster.)
My Picks: Mac Carbon, Urban Decay Hustle (Naked 1), Urban Decay Blackout (Naked 2), NYX Black, Makeup Geek Corrupt, Mac Smut.  You could even go with a fun dark color, like purple or green.


4.  Add mascara to your top lashes (and bottom if you have time) and you're done!


I used my Naked 1 Palette for this look, specifically the colors Sin, Naked, and Hustle.  My mascara is Mac's Haute & Naughty Too Black Lash.


So lovelies, what is your go-to quick look?  Share!


As always, everything in this post is my honest personal opinion.  No affiliate links were used.  I have not accepted any consideration for sharing these items with you.  Unless indicated otherwise, all products were purchased by me with my own money.
Monday, November 11, 2013

Mommy Makeup Monday: A Busy Girl's BFF...Dry Shampoo!

On Mondays, I share a tip, product or tutorial that will help you look polished and put-together quickly and with minimal effort.  You definitely don't have to be a rushed mom to benefit from these posts...anyone who needs to be out-the-door fast (and who doesn't?!) can appreciate Mommy Makeup Mondays!

So today isn't technically going to be a makeup Monday, since I'm sharing my most-used hair product.   But close enough...it's still going to get you out the door fast and looking presentable!


Dry shampoo has been an absolute lifesaver for me since having my daughter.  I used to have a strict 2-day rule with my hair...wash on Day 1, dry shampoo on Day 2, and then a wash with real shampoo and water.  I'd occasionally stretch it to Day 3 but only if it was a non-work day and I could throw my hair up in a messy bun. 

Now?!  Ha!  Not so much.  Why lie...when I was pregnant and battling the exhaustion that is the first trimester, I stretched my hair 3 days consistently by using dry shampoo.  Since having my baby girl here, it's only gotten worse!  Rocking 5th day hair is not unusual, I'm a little embarrassed to say!  Good thing my new BFF is here to help me through ;)

If you've never used a dry shampoo...first, stop living under a rock and get your butt to a drugstore to pick some up!!  The stuff is like gold in a can.  It takes your gross, dirty-looking hair and makes it look pretty much like you actually did wash and blow it out that morning.  Spray a medium amount in your roots, shaking the can as you go, all over the crown of your head (or wherever your style will show your roots) and especially at your part.  Give it 5 minutes to sink in, and rub your roots until no more whiteness is visible.  Brush your hair, and you're good to go!

That being said...here are my hits and misses for dry shampoos.  Hope you enjoy!

Grab These
1.  Bed Head Rockaholic Dirty Secret Dry Shampoo ($21)  I know it's expensive, but this stuff really is the hands-down best dry shampoo I've tried.  It leaves absolutely no white cast at all (and I have dark brown hair), doesn't leave a funky smell or any residue, and keeps your hair looking clean all day.  If I'm going to push it past Day 4, this is my secret weapon.  Ulta does sell these a few times per year at a deep discount to help raise money for breast cancer awareness.  Your can will be pink, not black, but the price is usually around $10 per can, which is a HUGE savings.  Ulta usually limits the number of cans you can purchase, but I always use the sale to stock up.  I want to say it occurs in either February or April...but watch your Ulta flyers...they always include it!

2.  Psssssst! Instant Dry Shampoo Spray ($6)  My stylist swears by this one, and she is so right.  It's amazing and sold at the drugstore = cheap.  If I'm not careful to rub it in well, it can leave a white cast, but that's the only reason it doesn't beat out the Bed Head dry shampoo.  When I'm out of Bed Head, you best bet I'm using this one!  (Just be careful not to grab the curly hair version of this by accident.  I did once, and it doesn't work nearly as well as the original!)

3.  Batiste Dry Shampoo ($8)  This is another drugstore version and is just as good as Psssssst!.  It's a little more expensive, so I've ranked it third, but it works amazingly.  What I do love about Batiste is that it comes in multiple scents, and they have a version for dark hair, too.

Pass on These
1.  LUSH No Drought Dry Shampoo ($14 for 4.6 oz.; $7 for 1.9 oz.)  I really love LUSH products and I really wanted to love this, too, but I'm sad to say I am not a fan at all...especially for the high price.  It didn't make my hair clean or even make it look clean, and it left a noticeable white cast in my brown hair.  You can find much better for much less money.

2.  Oscar Blandi Pronto Dry Shampoo Invisible Spray ($25)  I typically like Oscar Blandi products but I was really disappointed in this.  It worked well when I sprayed it in, but I found that after a short time my hair was back to looking greasy dirty like it had before.  For the price, it's just not worth it.  There's much, much better out there.

So lovely readers, tell me what dry shampoos you love and hate!  I'm always looking for a new one to try, so I'd love your feedback! 


As always, everything in this post is my honest personal opinion.  No affiliate links were used.  I have not accepted any consideration for sharing these items with you.  Unless indicated otherwise, all products were purchased by me with my own money.

Monday, November 4, 2013

Mommy Makeup Monday: Get Ready With Me in Under 10 Minutes

On Mondays, I share a tip, product or tutorial that will help you look polished and put-together quickly and with minimal effort.  You definitely don't have to be a rushed mom to benefit from these posts...anyone who needs to be out-the-door fast (and who doesn't?!) can appreciate Mommy Makeup Mondays!

Happy Monday! This week I have a video to share with you.  I decided to film my morning makeup routine one day while my daughter was napping.  It is possible to do a full face of makeup and look polished and put together in under 10 minutes!  If I hadn't been chatting so much while I worked, I'm sure this would have been even shorter :)

Enjoy, and see below the video for a list of the products I used.


Products Used:
Mac Paint Pot in Nubile (this was limited edition)
Mac Eyeshadows in Naked Lunch, Bisque, and Sable ($15 each)

Please note that the Clarins products and the Burberry foundation were gifts...I didn't buy them, but I do love them!  As always, no affiliate links were used.

Thanks for stopping by!


As always, everything in this post is my honest personal opinion.  No affiliate links were used.  I have not accepted any consideration for sharing these items with you.  Unless indicated otherwise, all products were purchased by me with my own money.

Monday, October 28, 2013

Mommy Makeup Monday: Whiter, Brighter Eyes in 1 Super Easy Step

On Mondays, I share a tip, product or tutorial that will help you look polished and put-together quickly and with minimal effort.  You definitely don't have to be a rushed mom to benefit from these posts...anyone who needs to be out-the-door fast (and who doesn't?!) can appreciate Mommy Makeup Mondays!

Happy Monday!  Today I have a great tip for all those sleep-deprived moms people out there.  This 20-second trick can help you look well-rested and will make your eyes look big and bright.

Lining your lower waterline with a white or a "nude for me" (i.e. your skin stone) eyeliner helps create the illusion of more open, whiter and brighter eyes.  It reduces redness and the natural pink tone of the waterline, and will make you look like you got 10 hours of sleep.  (We can dream, can't we?!)


In the photos above, you can see how much more bright-eyed I look with white or beige in my waterline.  The top left shows Stila's Kajal Eye Liner in Topaz. (The shade is now called Apricot Nude...it is $18 at Sephora.)  On the top right, I used Rimmel's Soft Kohl Kajal Pencil in Pure White. (It's only $3.99 at Ulta...can you beat that?!)  The bottom photo shows my eye with no liner.

Conversely, lining in black will close up your eyes.  (It is a great trick for those with big eyes who want to make them look smaller.)  Black also gives a more dramatic look to the eye, but doesn't help you look more well-rested and awake.  Below, on the left is my eye with no liner.  On the right, my waterline has Mac's Kohl Power Eye Pencil in Feline ($16) on it.

 
(In all 5 photos above, I am wearing Mac's Paint Pot in Nubile on my lids (it was limited edition, but is similar to Painterly), Mac's Haute & Naughty Too Black Lash Mascara (the length wand) on top and bottom lashes, Maybelline Fit Me Concealer under my eyes, and Anastasia Brow Wiz in Caramel to define my brows).

A quick note - I personally prefer a flat, matte white for the lower waterline, as opposed to a shimmery white.  Shimmer looks nice, but I find that matte white is more flattering.  I use my shimmery white pencils for inner corner and brow highlights.

Other great options for these shades in eyeliner pencils:

High End Beige Pencils:
Tarte EmphasEYES Inner Rim Brightener - $19 at Sephora
NARS Larger Than Life Long Wear Eyeliner in Rue Bonaparte - $24 at Sephora
Illamasqua Medium Pencil in Hex or Vow- $20 at Sephora

High End White Pencils:
Mac Eye Kohl in Fascinating - $16
NARS Larger Than Life Long Wear Eyeliner in Santa Monica Blvd - $24 at Sephora

Drugstore Beige Pencils:
Rimmel Scandal Eyes Waterproof Kohl Liner in Nude - $4.49 at Ulta
(This is the only one I could find!!  If you know of another, please leave it in the comments below!)

Drugstore White Pencils:
NYX Slide On Pencil in Pure White - $7.99 at Ulta
Jane Cosmetics Water-Resistant Eyeliner in Pure White - $6 at Ulta (on sale right now for $4!)
Prestige Kohl Eyeliner in White - $4.29 at Ulta

Tell me what you think!  Will you try this quick tip?  Do you already do this on a daily basis to help fake sleep?  What are your favorite pencils?

As always, everything in this post is my honest personal opinion.  No affiliate links were used.  I have not accepted any consideration for sharing these items with you.  Unless indicated otherwise, all products were purchased by me with my own money.

Monday, October 14, 2013

Mommy Makeup Monday: Pressed Powder Foundations

On Mondays, I share a tip, product or tutorial that will help you look polished and put-together quickly and with minimal effort.  You definitely don't have to be a rushed mom to benefit from these posts...anyone who needs to be out-the-door fast (and who doesn't?!) can appreciate Mommy Makeup Mondays!

Today's topic is a quick and easy way to hide imperfections, discoloration, and even out your skintone.  For years, I have sworn by powder foundations as the secret to making your skin look nice in less than a minute.  I'm not talking about the good old "buff swirl tap" ...whatever... that bareMinerals claims will change your world.  (Personally, I'm not a fan.  I don't get enough coverage, it takes too long, and it makes a giant mess of my vanity.)  I have always used pressed powder foundations, not loose powders.

It is important to know that powder generally looks and works best with oily/combination skin, as it helps keep shine at bay.  If you have dry skin, I would recommend a BB or CC cream or a tinted moisturizer instead of a powder foundation.  (My picks: Dr. Jart+ Premium Beauty Balm, Laura Mercier Tinted Moisturizer, or Garnier Skin Perfecter BB Cream.  More to come in future posts!)

The pressed powder that has been my Holy Grail quick and easy foundation for close to 10 years is the Mac Studio Fix Powder Plus Foundation ($27.00).  It comes with a cosmetic sponge, but I have always applied mine with a kabuki-style brush.  I am currently using the Sigma F45 buffer brush, which I think is a steal at $24.00.  (The comparable Mac 182 buffer brush is $53.00!)  I swirl my brush around the compact and buff the powder into my skin using circular motions.  I apply more to my T-zone, which gets oily faster, and just blend into my cheeks without using more product.  It takes mess less than 1 minute to perfect my skin.  This foundation gives great coverage with a matte finish.  Bonus: it comes in 40 shades!  


(I hit pan on mine a long time ago!)

Recently, I have been using Burberry's Sheer Luminous Compact Foundation ($55.00).  This has replaced my Mac Studio Fix for now, but at the price point, I can't say I would repurchase, especially given that it is about half the size of Mac's foundation.  (In full disclosure, the Burberry foundation was gifted to me from my sister.)  The coverage is slightly more sheer (which you would expect given the name) but can be built up to leave your skin looking absolutely flawless.  It is scented; Mac's is not.  It also has a matte finish, and on me, will last longer than Mac's foundation before I need to reapply.  The Burberry packaging absolutely emphasizes that this is a luxury foundation.  It is mirrored metal with the classic Burberry check print, heavy, and has a magnetic closure.  If you're due to receive a gift or just want to treat yourself, definitely try this one out!


(I've hit pan on this one, too!)

While these two are definitely my picks for powder foundation, there are plenty of other options on the market, as well.  bareMinerals' Ready Foundation ($29.00) is much better than their loose foundation, in my opinion.  Their shade range is more limited than Mac (20 shades, compared to Mac's 40), but the product is good.  Benefit Hello Flawless ($34.00) is also a great product, but only comes in 9 shades, and is half the size of Mac's foundation.  Smashbox Halo Hydrating Perfecting Powder ($59.00) is the most expensive, but also the largest product.  It only comes in 6 shades.

If you're shopping at the drugstore, Cover Girl makes TRUblend Pressed Powder ($8.99), which would be a good way to try this type of product without the high price point.  This powder is more sheer though, and more comparable to Mac's Mineralize Skinfinish Natural.  

If you find yourself rushing your makeup application or leaving the house with none on because you don't have time, I definitely recommend trying a pressed powder foundation.  They provide excellent coverage quickly and easily.  

Have you found any other methods of perfecting your skin that take mere minutes?  I'd love to hear your suggestions!  Have you tried pressed powder foundations?   Do you love or hate them?

Thanks for stopping by!  Hope you enjoyed :)

As always, everything in this post is my honest personal opinion.  No affiliate links were used.  I have not accepted any consideration for sharing these items with you.  Unless indicated otherwise, all products were purchased by me with my own money.